Memuat Plomia.com_
User Guide
Common information and syntaxes of Plomia.com web application
There are four sections in this Guide:
1. Signing Up:
2. Uploading Entries and the Beginning Balance:
1. 'date' = transaction occurence time (DD/MM/YYYY or YYYY-MM-DD) which will allow you to know exact information on a certain period instantly using our Dynamic Period feature 2. 'base_account*' = name that represent groupings of similar transactions or same in characteristics 3. 'account*' = the account which affects or got affected by the 'base_account's changes, similar yet opposites of 'base_account' 4. 'amount' = the base_account's money-equivalent value, positive means increasing, negative otherwise <-- Important: the amount column always refers only to the base_account, please pay enough attention to the negative or positive sign.
* Only letters, numbers, and spaces are allowed
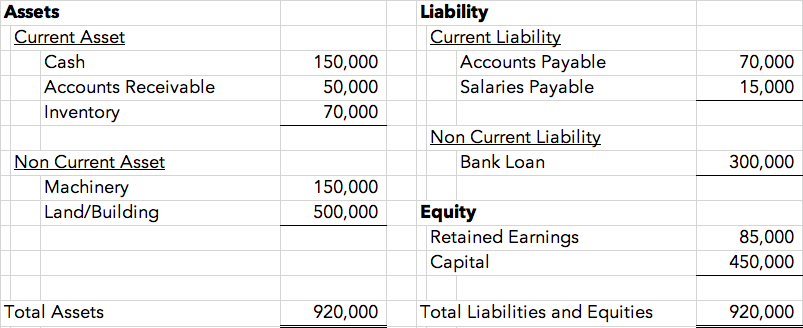
There is an additional column if you want to write a note to the entry or use the inventory and/or depreciation features: 5. 'note' = useful for writing additional note which will do nothing but help the user remember related things 6. 'adjust' = depending on the syntax (see point 4 below), this column will be recognised by Plomia's system to either run the inventory or the depreciation feature For example, suppose this is your financial position at the beginning of the period when starting to use Plomia.com. Therefore, your entries should be adjusted prior to uploading:
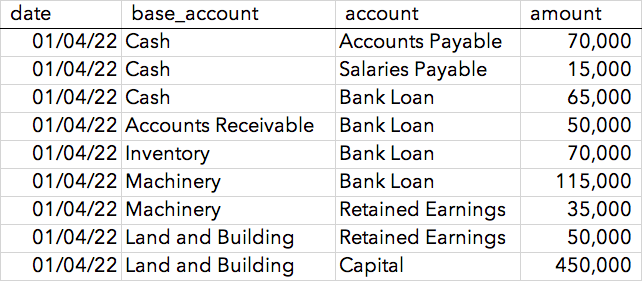
First, you will need to split and equalise your balance sheet accounts:
base_account | account | amount:
- Cash | Accounts Payable | 70,000 <-- the 80,000 remaining 'Cash' will be used for the next calculations
- Cash | Salaries Payable | 15,000 <-- 65,000 'Cash' remains
- Cash | Bank Loan | 65,000 <-- 'Cash' finished, 235,000 'Bank Loan' remains
- Accounts Receivable | Bank Loan | 50,000
- Inventory | Bank Loan | 70,000
- Machinery | Bank Loan | 115,000 <-- 'Bank Loan' finished, 35,000 'Machinery' remains
- Machinery | Retained Earnings | 35,000
- Land/Building | Retained Earnings | 50,000
- Land/Building | Capital | 450,000 <-- all finished and balanced, no remainders
Once ready, you can click the 'upload' button at the top of the page (or in the top-right menu for smaller screens). Your Excel entry should then look like this:
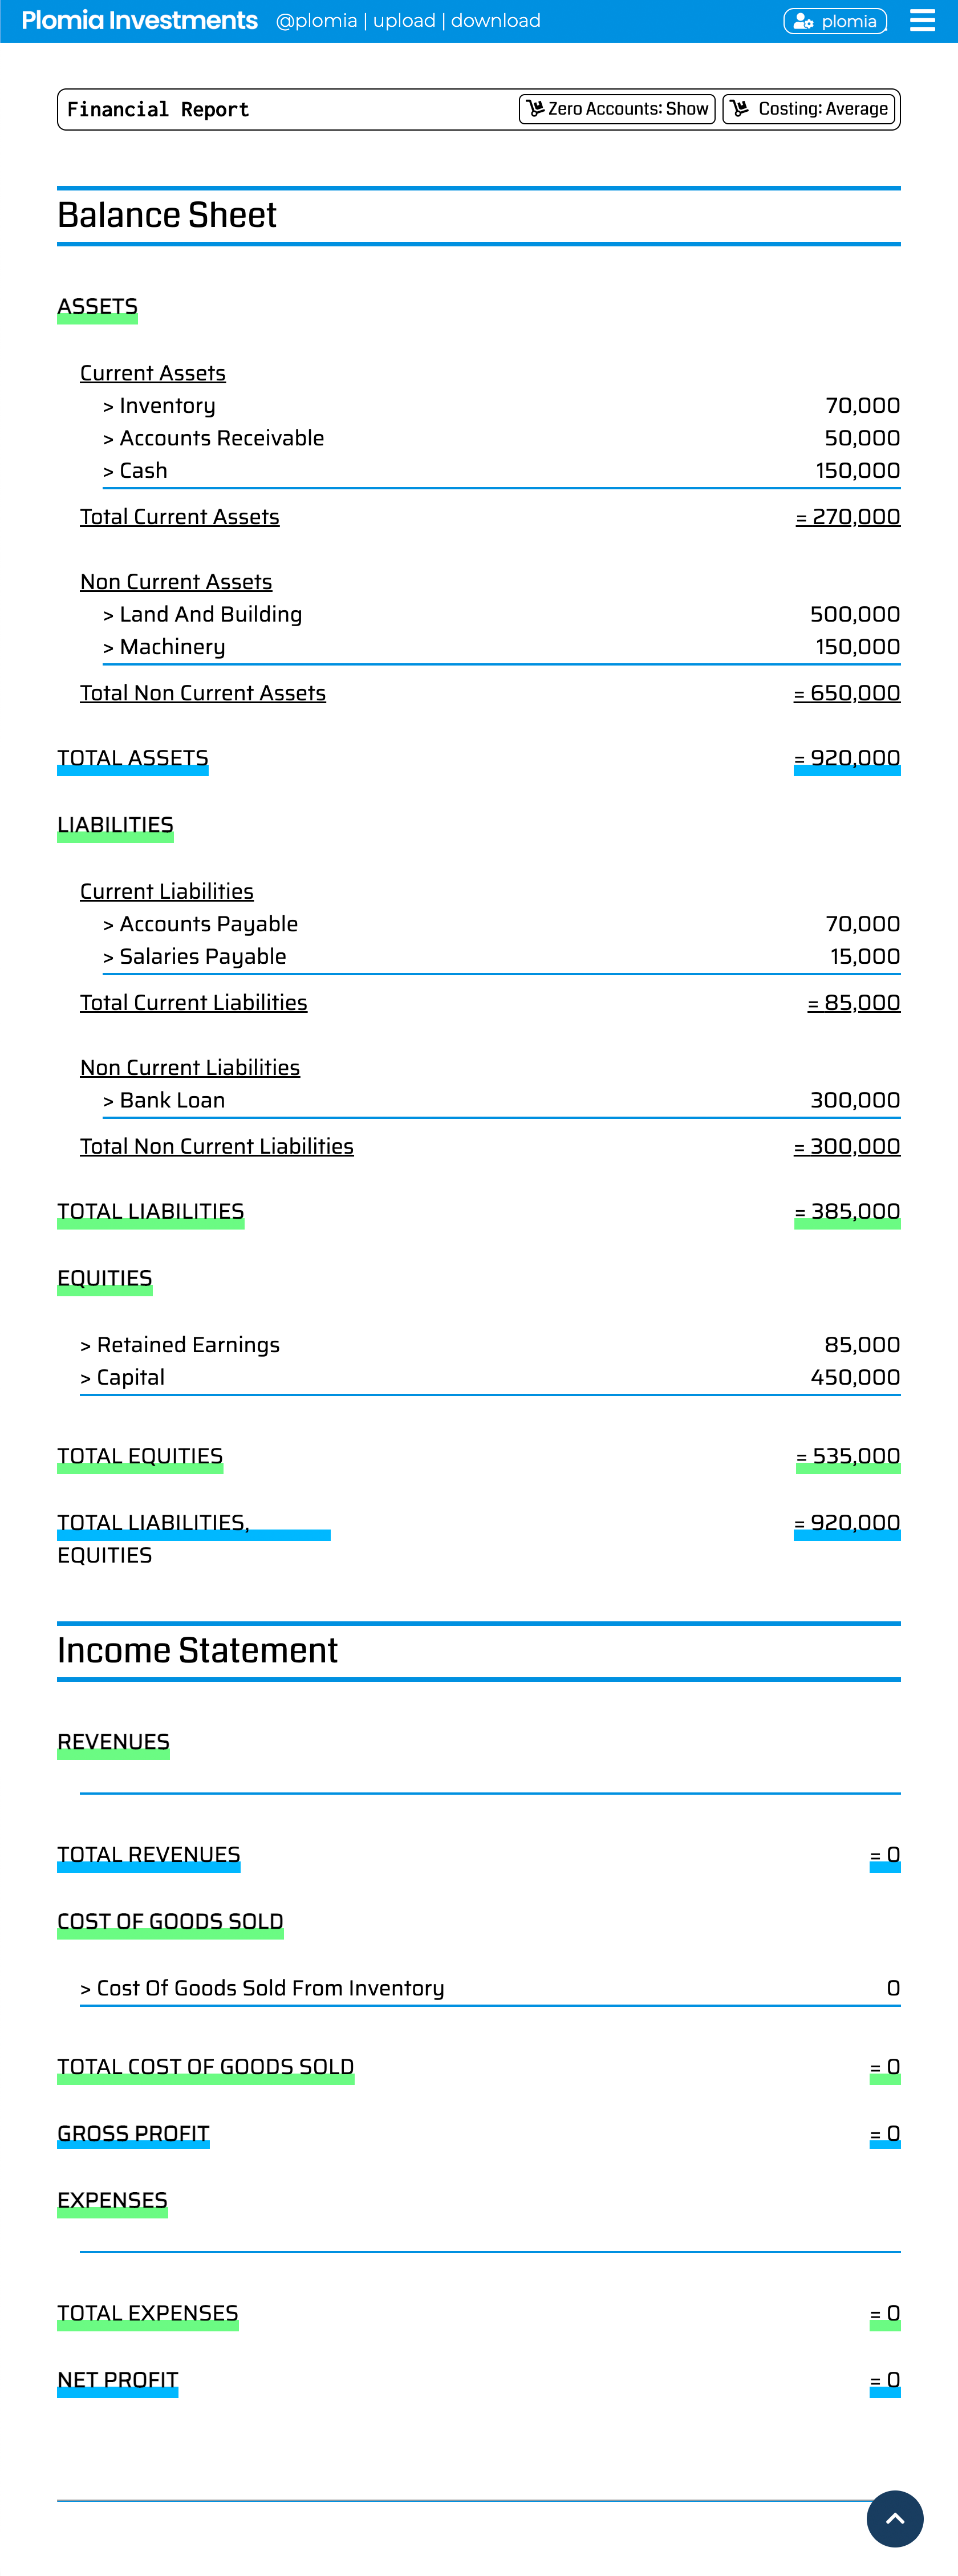
After being uploaded and moved to the correct positions:
Plomia © 2024 PT Plomia Data Sekuritas_
- Welcome to Plomia.com!
- Our system accepts Excel (.xlsx) files which you can upload once logged in.
Important: Free Trial account can only upload 100 entries in a month. - You can upgrade your account in the profile menu after logging in by taking one of the three available plans starting from USD 89. Each upgrade will last for 30 days and if not extended, your account will be downgraded back to Free Trial plan.
1. 'date' = transaction occurence time (DD/MM/YYYY or YYYY-MM-DD) which will allow you to know exact information on a certain period instantly using our Dynamic Period feature 2. 'base_account*' = name that represent groupings of similar transactions or same in characteristics 3. 'account*' = the account which affects or got affected by the 'base_account's changes, similar yet opposites of 'base_account' 4. 'amount' = the base_account's money-equivalent value, positive means increasing, negative otherwise <-- Important: the amount column always refers only to the base_account, please pay enough attention to the negative or positive sign.
* Only letters, numbers, and spaces are allowed
There is an additional column if you want to write a note to the entry or use the inventory and/or depreciation features: 5. 'note' = useful for writing additional note which will do nothing but help the user remember related things 6. 'adjust' = depending on the syntax (see point 4 below), this column will be recognised by Plomia's system to either run the inventory or the depreciation feature For example, suppose this is your financial position at the beginning of the period when starting to use Plomia.com. Therefore, your entries should be adjusted prior to uploading:
First, you will need to split and equalise your balance sheet accounts:
base_account | account | amount:
- Cash | Accounts Payable | 70,000 <-- the 80,000 remaining 'Cash' will be used for the next calculations
- Cash | Salaries Payable | 15,000 <-- 65,000 'Cash' remains
- Cash | Bank Loan | 65,000 <-- 'Cash' finished, 235,000 'Bank Loan' remains
- Accounts Receivable | Bank Loan | 50,000
- Inventory | Bank Loan | 70,000
- Machinery | Bank Loan | 115,000 <-- 'Bank Loan' finished, 35,000 'Machinery' remains
- Machinery | Retained Earnings | 35,000
- Land/Building | Retained Earnings | 50,000
- Land/Building | Capital | 450,000 <-- all finished and balanced, no remainders
Once ready, you can click the 'upload' button at the top of the page (or in the top-right menu for smaller screens). Your Excel entry should then look like this:
After being uploaded and moved to the correct positions:
3. Asset Depreciations and Prepaids Adjustment:
- Adjustment entries are entries with additional 'adjust' column which will trigger our system's special feature.
- There are currently 1 (one) supported special entry type, which is asset depreciation and/or prepaid feature.
Important: put the inventory account name and asset name in the 'account' column (NOT 'base_account'). Failure to do so may cause significant error!
- The asset depreciation and/or prepaid feature will automatically reduce and convert the value of the specified account over time into depreciation or prepaid adjustment expense.
- There are two conditions with different format/syntaxes: purchasing assets and disposing assets.
- Purchasing/Adding Assets
depreciation_method**; expected_usage_month_period = end_value*
* End value or scrape value, usually zero for prepaid expenses
** Currently, there are three supported 'depreciation_method':
1 = Prepaid Expenses
2 = Straight Line
3 = Double Declining
E.g. renting an office space, fully paid up front:
'date' = 2022-04-01
'base_account' = Cash
'account' = Prepaid Office Rent <-- Important: put the asset name in the 'account' column (NOT 'base_account')!
'amount' = -9500
'adjust' = 1; 24 = 0
E.g. bought a packaging equipment:
'date' = 2022-04-01
'base_account' = Cash
'account' = PackPro 2200RX <-- Important: put the asset name in the 'account' column (NOT 'base_account')!
'amount' = -1500
'adjust' = 2; 48 = 150 - Disposing/Removing Assets
asset_id
The asset_id is obtained after uploading the asset entry and clicking the 'Show Entries' button at the asset account name and find: ( Asset ID: xxxxxxxxx )
Important: each unique asset_id can only be disposed once, newer disposal entry will replace/overwrite any previous disposal entry for the same asset_id.
E.g. fully charging the remaining Prepaid Office Rent (e.g., asset_id 228999) in the middle of the usage period:
'date' = 2022-04-01
'base_account' = Cash
'account' = Prepaid Office Rent <-- Important: put the asset name in the 'account' column (NOT 'base_account')!
'amount' = 0 <-- the actual paid or gained (cash) amount to dispose the prepaid expense, may carry profits or losses, usually zero
'adjust' = 228999
E.g. selling the packaging equipment (e.g., asset_id 255999) after 2 months:
'date' = 2022-06-01
'base_account' = Cash
'account' = PackPro 2200RX <-- Important: put the asset name in the 'account' column (NOT 'base_account')!
'amount' = 1200 <-- selling price/disposal value (cash), may carry profits or losses
'adjust' = 255999
4. Editing and Downloading Reports
Limited editing such as changing names and positions can be done directly on the dashboard, however, amount, date, and other major changes must be made by uploading adjustment entries. Click any account you want to edit, you will see this menu below showed up beside it. Click on the icons depending on your needs:
= 'Move', default and special accounts (system accounts) like Asset, Inventory, Retained Earnings, etc. which are automatically created by the system are immovable
= 'Add Sub/Child Account', create a new account inside the current account
= 'Edit Name', this will change all the previous account name in the database into the new value
= 'Show Entries', will show all the entries containing the account name
Download your financial report by clicking 'Download' at the top (or in the top-right menu for smaller screens) and choose Your last configured date will be used in the PDF report. Accounts having zero amounts are not showed on the downloaded reports. Download sample PDF report and Excel report.
For more information please contact our administrators via email [email protected] or WhatsApp (+62) 8777-500-1000.